Resizing an EBS volume to a larger size is a straightforward process in the AWS console. However, reducing the size of an EBS volume is not supported directly. Unlike the resizing to larger size functionality, there is no built-in feature that allows you to decrease the size of an EBS volume through the AWS console.
Resizing and Reducing EBS Volumes: Step-by-Step Guide
Resizing and reducing EBS volumes is not a simple task, but by following these steps, you can successfully accomplish it while ensuring data integrity and system stability. This guide will walk you through the process.
Note: Before proceeding, please exercise caution and ensure you have backups of your data to avoid any potential data loss.
- Stop all traffic and connections, except for one SSH connection for your use.
- Take a snapshot of the volume (backup):
- Go to the AWS Management Console
- Access the EC2 service and navigate to the EBS section
- Locate the volume you want to resize and create a snapshot
- Create a new EBS volume with a smaller size:
- Choose the same volume type as your old volume (e.g., gp2, gp3)
- Enter the desired size (e.g., 70GB)
- Select the same availability zone as the old volume
- Add a tag for the new volume, e.g., NAME: new-vol
- Attach and format the new volume:
- Go to the EBS section and locate the newly created volume
- Click "Attach" and select the EC2 instance
- Specify the Device Name as /dev/sdf (or any available device name)
- Click "Attach" to attach the new volume to the EC2 instance
- Use the command
lsblkto list the current disks and verify that /dev/sdf is listed. - Check if the new volume has any data using the command
sudo file -s /dev/sdf- If it displays "/dev/sdf: data," the volume is empty and can be formatted
- If it shows any other output, do not format the volume
- Format the new volume:
- Format the new volume with the following command:
sudo mkfs -t ext4 /dev/sdf
- Mount the new volume:
- Create a directory to mount the new volume:
sudo mkdir /mnt/new-vol
- Mount the new volume to the directory:
sudo mount /dev/sdf /mnt/new-vol
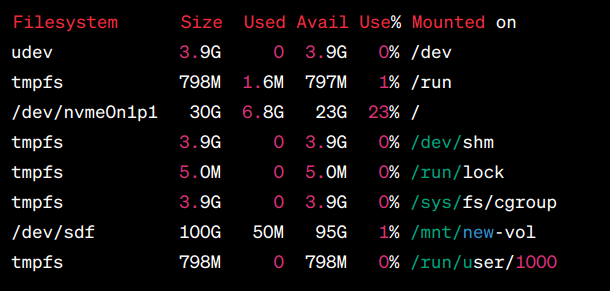
- Verify that the new volume is mounted using the df -h command
- Copy data from the old volume to the new volume:
- Use the
rsynccommand to copy data from the old volume to the new volume:
sudo rsync -axv / /mnt/new-vol/.
Please note that the time taken for the copy process will depend on the size of your data.
- Use the
- Make the new volume mountable:
- Install GRUB on the new volume using the following command
sudo grub-install --root-directory=/mnt/new-vol/ --force /dev/sdf
- Unmount the new volume:
sudo umount /mnt/new-vol
- Update UUIDs and labels:
- Check the UUID of the old volume using the
blkidcommand.

- Copy the UUID value for backup purposes.
- Replace the UUID of the new volume with the copied UUID using the
tune2fscommand:
sudo tune2fs -U COPIED_UUID /dev/sdf
If you encounter an error like this "This operation requires a freshly checked filesystem."
Run
sudo e2fsck -f /dev/sdfto check the filesystem.- Check the system label of the old volume using the command:
sudo e2label /dev/sdf
- Replace the label of the new volume with the old volume's label:
sudo e2label /dev/sdf cloudimg-rootfs
- Check the UUID of the old volume using the
- Detach the new volume and complete the process:
- Stop the EC2 instance.
- Detach the old volume and the new volume from the EBS section in the AWS console.
- Attach the new volume to /dev/sda1.
- Start the EC2 instance.
- SSH into the EC2 instance and verify that everything is functioning correctly.
Once your system is working as expected, you may consider deleting the old volume and its snapshot after a week, if no issues arise. However, it's recommended to keep them as backups for added security.
By following these steps carefully, you can resize and reduce your EBS volumes while minimizing risks and ensuring the integrity of your data and system.