I’ve been experimenting with running a Kubernetes cluster set up by kubeadm on a 3 local machine (master node and two workers). It seems to be working great, so here’s how I did it.
So let us Talk about pre-requirements:-
- One or more machines running a deb/rpm-compatible Linux OS; for example Ubuntu or CentOS.
- 2 GiB or more of RAM per machine — any less leaves little room for your apps
- At least 2 CPUs on the machine that you use as a control-plane node(master node)
- Full network connectivity among all machines in the cluster. Use either a public or a private network (You can use a home router network).
Before starting you should ensure little things:-
- Check Swap status in all nodes, You MUST disable swap ( sudo swapoff -a) in order for the Kubelet to work properly
- Check network adapters If you have more than one network adapter, and your Kubernetes components are not reachable on the default route, we recommend you add IP route(s) so Kubernetes cluster addresses go via the appropriate adapter.
- Letting Iptables see bridged traffic Make sure that the
br_netfiltermodule is loaded. This can be done by runninglsmod | grep br_netfilter. To load it explicitly, callsudo modprobe br_netfilter. As a requirement for your Linux Node's IP tables to correctly see bridged traffic, you should ensurenet.bridge.bridge-nf-call-iptablesis set to 1 in yoursysctlconfig, e.g.
cat <<EOF | sudo tee /etc/modules-load.d/k8s.conf
br_netfilter
EOF
cat <<EOF | sudo tee /etc/sysctl.d/k8s.conf
net.bridge.bridge-nf-call-ip6tables = 1
net.bridge.bridge-nf-call-iptables = 1
EOF
sudo sysctl --system
So let's talk about how have I done the setup. I have 3 systems with ubuntu 18.04, and 3 nodes connected into the modem via LAN cable. While installing docker, one of my worker node went down and tried several times to return back to live, anyway done installation with one master and one worker node, installed docker then kubeadm kubectl kubelet into both nodes, after installation, I initialised cluster with kube adm and installed a cni network which is ‘canal’ also joined my worker node with kubejoin command.
Kubernetes uses the Container Runtime Interface (CRI) to interface with your chosen container runtime, so here we used the most familiar one CRI’s Docker. If you don’t specify a runtime, Kubeadm automatically tries to detect an installed container runtime by scanning through a list of well-known Unix domain sockets.
So let's start to install Docker
Update the apt package index and install packages to allow apt to use a repository over HTTPS:
1 sudo apt update
2 sudo apt-get install ca-certificates curl gnupg lsb-release
Add Docker’s official GPG key:
$ curl -fsSL https://download.docker.com/linux/ubuntu/gpg | sudo gpg --dearmor -o /usr/share/keyrings/docker-archive-keyring.gpg
Use the following command to set up the stable repository
echo "deb [arch=$(dpkg --print-architecture) signed-by=/usr/share/keyrings/docker-archive-keyring.gpg] https://download.docker.com/linux/ubuntu \
$(lsb_release -cs) stable" | sudo tee /etc/apt/sources.list.d/docker.list > /dev/null
Install Docker
1 sudo apt-get update
2 sudo apt-get install docker-ce docker-ce-cli containerd.io
Configure the Docker daemon, in particular, to use systemd for the management of the container’s cgroups.
sudo mkdir /etc/docker
cat <<EOF | sudo tee /etc/docker/daemon.json
{
  "exec-opts: [native.cgroupdriver=systemd],
  "log-driver": "json-file",
  "log-opts":
   {
   "max-size": "100m"
   },
  "storage-driver": "overlay2"
}
EOF
ps- MUST install Docker ,kubeadm kubectl kubelet in all nodes,
kubeadm: The command to bootstrap the cluster.kubelet: The component runs on all of the machines in your cluster and does things like starting pods and containers.kubectl: The command line kubectl to talk to your cluster.
Update the apt package index and install packages needed to use the Kubernetes apt repository:
1 sudo apt-get update
2 sudo apt-get install -y apt-transport-https ca-certificates curl
Download the Google Cloud public signing key:
sudo curl -fsSLo /usr/share/keyrings/kubernetes-archive-keyring.gpg
https://packages.cloud.google.com/apt/doc/apt-key.gpg
Add the Kubernetes apt repository:
echo "deb [signed-by=/usr/share/keyrings/kubernetes-archive-keyring.gpg] https://apt.kubernetes.io/ kubernetes-xenial main" | sudo tee /etc/apt/sources.list.d/kubernetes.list
Update apt package index, install kubelet, kubeadm and kubectl, and pin their version:
1 sudo apt-get update
2 sudo apt-get install -y kubelet kubeadm kubectl
3 sudo apt-mark hold kubelet kubeadm kubectl
we can deploy Kubernetes cluster with kubeadm.
you must refer kubeadm and kubectl commands before starting deployment
To setup cluster
sudo kubeadm init --pod-network-cidr=192.168.0.0/16
(Ensure IP range satisfies local network range, also use the root user for running kubeadm commands)
You will get the following response:
Your Kubernetes control-plane has initialized successfully!
To start using your cluster, you need to run the following as a regular user:

  mkdir -p $HOME/.kube
  sudo cp -i /etc/kubernetes/admin.conf $HOME/.kube/config
  sudo chown $(id -u):$(id -g) $HOME/.kube/config

You should now deploy a Pod network to the cluster.
Run "kubectl apply -f [podnetwork].yaml" with one of the options listed at: /docs/concepts/cluster-administration/addons/

You can now join any number of machines by running the following on each node as root:
kubeadm join <control-plane-host>:<control-plane-port> --token <token> --discovery-token-ca-cert-hash sha256:<hash>
if the join token is expired you can run
kubeadm token create --print-join-command in master node
this will give output like this.
kubeadm join 192.168.10.15:6443 --token l946pz.6fv0XXXXX8zry --discovery-token-ca-cert-hash
sha256:e1e6XXXXXXXXXXXX9ff2aa46bf003419e8b508686af8597XXXXXXXXXXXXXXXXXXX
Run the following command
mkdir -p $HOME/.kube
sudo cp -i /etc/kubernetes/admin.conf $HOME/.kube/config
sudo chown $(id -u):$(id -g) $HOME/.kube/config
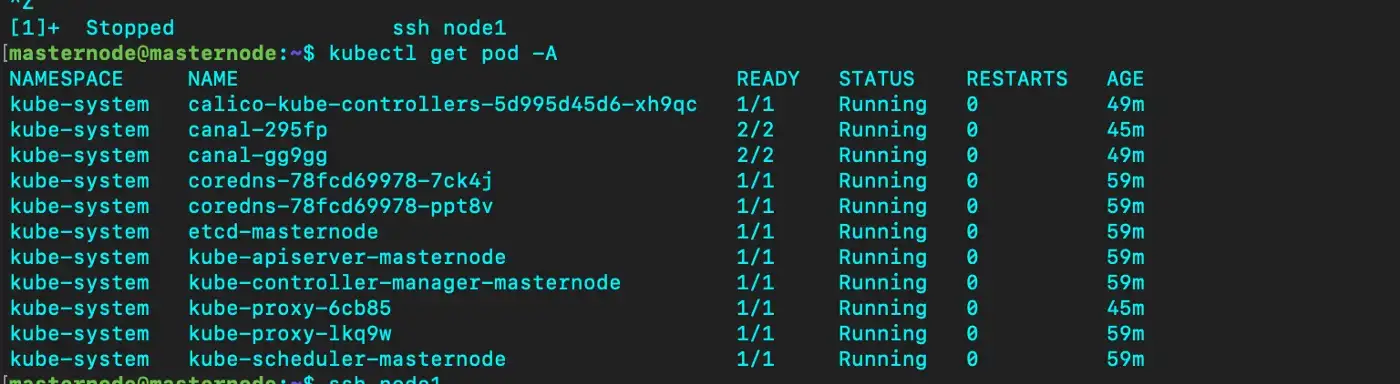
just do command
kubectl get pod -A
you can see core-dns pod still in a container creating state. We need to deploy a CNI (container network interface) in our cluster.
There is a lot of CNI available today like the most used ones such as Flannel, Calico, etc.
Here we use Canal unites Flannel and Calico, which provides networking and network policy
So let's start installing Calico for policy and flannel installation.
1. Ensure that the Kubernetes controller manager has the following flags set:
--cluster-cidr=<your-pod-cidr>and
--allocate-node-cidrs=true
2. On kubeadm, you can pass
--pod-network-cidr=<your-pod-cidr>to kubeadm to set both Kubernetes controller flags (we did this while initialising kubeadm)
3. Download the flannel networking manifest for the Kubernetes API datastore.
$ curl https://docs.projectcalico.org/manifests/canal.yaml -O
If you are using pod CIDR 10.244.0.0/16, skip to the next step. If you are using a different pod CIDR with kubeadm, no changes are required since Calico will automatically detect the CIDR based on the running configuration. For other platforms, make sure you uncomment the CALICO_IPV4POOL_CIDR variable in the manifest and set it to the same value as your chosen pod CIDR to install Calico.
$ kubectl apply -f canal.yamlafter some time master node status will change to Ready state

kubeadm join <control-plane-host>:<control-plane-port> --token <token> --discovery-token-ca-cert-hash sha256:<hash>
We can join nodes by using the above command. To check node status run the following command
kubectl get nodes

Now you will see the worker node in the Ready state
so let's install kubernates dashboard, run
kubectl apply -f https://raw.githubusercontent.com/kubernetes/dashboard/v2.4.0/aio/deploy/recommended.yaml
To access Dashboard from your local workstation you must create a secure channel to your Kubernetes cluster. Run the following command:
kubectl proxy
Here we are running a master node in another system so we need to enable tunneling with a port
Tunnel command should be like this in local
ssh -N -L 8001:localhost:8001 username@ipaddress
username and IP address should be the master node.
Then you can access by the following address
http://localhost:8001/api/v1/namespaces/kubernetes-dashboard/services/https:kubernetes-dashboard:/proxy/
To get Token , run the command given below:
kubectl create token kube-system -n kube-system
or
kubectl get secret $(kubectl get serviceaccount default -o jsonpath="{.secrets[0].name}") -o jsonpath="{.data.token}" | base64 --decode

Run the following command to disable warning
kubectl create clusterrolebinding dashboard-role-bind --clusterrole=cluster-admin --serviceaccount=kube-system:default
better do dashboard deployment in masternode , using node affinity in pod spec will help.
To test kube-adm cluster, let's deploy a 2048 app, It's a single-player sliding tile puzzle game✌🏻
kubectl apply -f https://gist.githubusercontent.com/sufiyanpk7/e53d9cc1be11eed827d46d1691b73b6b/raw/be437da654b1bcd2076948dea5d44ef1ac4c7cb6/2048-game.yml
curl -s  https://raw.githubusercontent.com/abrarcv170/public-scripts/main/nodeport-2048.sh | bash
(For External access, we can use Nginx ingress.
To setup cluster with kubeadm is little difficult but will give you more idea about cluster orchestrations. Before you start debug, its better to visit official Troubleshooting doc for issues, it will give you more Relief.